Online sound level monitoring system
How to set up a low-cost, long-term and internet connected noise monitoring system
Requirements:
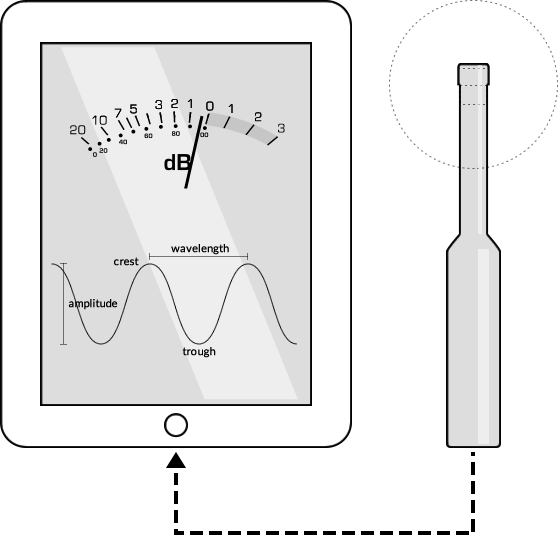
- Apple iOS device: iPad, iPhone or iPod Touch
- StudioSixDigital microphone accessory:
- AudioTools application
- A Dropbox or iCloud account (free or paid)
- Electrical power and internet connection with WiFi
Connection setup for the device
For a long-term monitoring solution you need a microphone accessory which provides power to the Apple iOS device. The iPrecisionMic, iTestMic2 and iAudioInterface2 all provide external power to your device.
Connect your microphone accessory to your iPad, iPhone or iPod Touch and connect to the external power supply so that the device runs permanently. The device will continue in the event of a power-cut using the internal battery.
File upload settings (iCloud / Dropbox)
Set-up your Apple device to connect to the internet through WiFi and open up the AudioTools app.
Under Settings > General Settings > File Storage choose "Cloud File Storage". In the next window choose between Dropbox and click "Link" to link to your Dropbox account or iCloud.
Load AudioTools module - SPL Graph
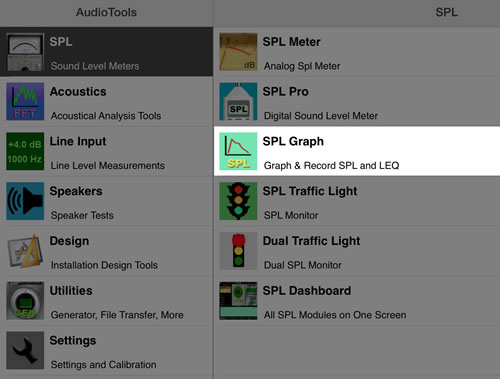
We recommend using the SPL > SPL Graph module for recording data. The settings can be configured by clicking the bottom right spanner icon.

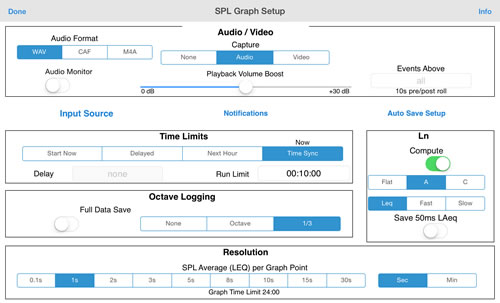
Setup: File saving
You will need to configure the module to save your data automatically. Click "Auto Save Setup" and choose to "Auto Save Data at End of Timed Run" and "Restart After Auto Save (Continuous Run)". This will have the module automatically produce new data files and save them to Dropbox or the iCloud. Under "Name Options" you can choose to use the Date & Time as the "File Naming Scheme" which helps to organise the files in chronological order.
Setup: Time setting
By choosing "Time Sync" and a short Run Limit you will have a regular update of your sound level data and audio. For example, a run limit of 10 minutes will upload a new text file of data and accompanying audio file every 10 minutes. These can then be viewed in your web browser or downloaded for analysis.
Setup: Audio
AudioTools offers M4A compressed audio which is up to 1/10th the size of uncompressed WAV. This allows the files to be uploaded and downloaded much faster and take up less space on your device and your Dropbox/iCloud account.
| Format | Recording time with 32GB storage | Details |
| WAV | 3.5 days (16 bit) | Uncompressed - can be used for post-processing levels |
| CAF | 15 days | Compressed (lossless) - not a highly supported format and usually needs converting to WAV before use |
| M4A | 36 days | Compressed (lossy) - highly supported format but shouldn't be used for post-processing levels |
The audio format should be chosen based on your needs but in most cases M4A is ideal for reducing the file size.
Audio gain and clipping
"Clipping" is the name for the distortion that occurs when loud peaks of sound go beyond the dynamic range of the audio file. This level is set under Settings > Microphone Setup or by clicking "Input Source" in the SPL Graph Setup page and choosing "Low Range" for lower level events and "High Range" for when monitoring loud peaks. When using the iAudioInterface the gain is also configured under "Preamp Hardware Gain".
The low end of the dynamic range depends on the bit-rate. A 16 bit file has a dynamic range of 96dB (unweighted) which is suitable for most situations. For sensitive low frequency and low level monitoring situations a 24 bit file might be preferable as it provides a dynamic range of 144dB.
The Info page in the app gives a lot of information about how to calibrate here if you have a calibrator, which is necessary for a Type 1 recording.
Setup: Octave Logging
Including octave or third octave data will give you a better understand of frequency data but it will increase the text file size and prevent a resolution below 1s.
Setup: Ln settings
For most situations the correct settings will be A-weighted. This applies a weighting to the sound levels that is used in most standards and is closer to the behaviour of the human ear. C-weighted levels are usually for very high level sounds.
Setup: Resolution
We recommend using a resolution of 1 minute or 1 second for most monitoring situations. 0.1s is best only for detailed study of impact of complicated sound events such as wind turbine amplitude modulation. To enable the 0.1s resolution you must first disable "Octave Logging".
Ready? Start running
Begin measuring from within the module by clicking the Mic icon. You will see the levels appear plotted on the screen. When the run limit is reached a new file will be started and the most recent data file and audio will be uploaded.
It's also recommended to read the following guides:
Frequently Asked Questions
Can this be accessed or configured remotely?
Yes, using Single-App mode the device can be accessed and configured remotely. We recommend that you follow the guide here on the StudioSixDigital website.
Class 1 (Type 1) certification
The iPrecisionMic accessory is built to a Class 1 (Type 1) standard but the certification will require the entire device to be tested in a laboratory and calibrated as a single unit.
Can this be run without an internet connection?
There only need for the internet connection is for uploading the test data to your iCloud or Dropbox account. The device will otherwise work the same offline.